Sorting by

×
Home Blog Page 15

PalmForce: Get Paid While Using PalmPay App

1

So I talked about the different ways to make money on PalmPay app a few months ago. Everything in that post still works. And here is another sure way to get paid while using the PalmPay App on your Android or iPhone. This option/Feature is called PalmForce

What is PalmForce?

PalmForce is PalmPay’s Super Referral program for everyone. It is basically PalmPay’s rewards programme for customers who invite others to the platform on a regular basis. You earn rewards for inviting new customers and cashback on your transactions!
1. Earn N200 cash for each friend you invite
2. Earn cash back on the transactions of people you invite
3. The more you refer and the more of your downlines are active each month, the more you earn.

How do I Join PalmForce?

First, you have to register. It is free. Use this Invitation code: F4IK17
After you have registered on Palmpay, click on the menu bar which is at the top left corner of the app
Select Invitation
Click on the Join Palmforce button to apply.

Is it free to Join PalmForce?

Yes. Yup. Yasssss!

How Much Can I Make as a PalmForce Member?

Reward is calculated based on your Level (Gold, Silver, Bronze), the number of referrals you have complete and the activity of your base within a certain month. Within the PalmForce section of the app, you’ll be able to monitor the reward which you have earned and the amount which has been settled.

How Can I talk to PalmPay Just In Case?

Please contact their customer care team via the Live Chat on the app, Call (0170 0570 0) or e-mail (support@palmpay.co)

I have started earning from the PalmForce program and I am sure you can too. I would also suggest joining the PalmForce group on Facebook to learn more. You can do so by clicking here

How to Withdraw Your PiggyVest Investments

0

So I invested some money in a Maize Farm through PiggyVest last year and 9 months later, I cashed out the investment and its returns. In this post, I will be showing you how to Withdraw Your PiggyVest Investments when they (or it) matures. You might not get an email when your investment matures. I did not. But I received a pushing notification on the app.

How to Withdraw Your PiggyVest Investments

When your investment matures, go to “Invest” on your PiggyVest Dashboard or follow this link
Then click on Cash Out on the matured Investment. See an example in the screenshot below:

Piggyvest Investment Withdrawal cashout 1
Cashing out on Website
Piggyvest Investment Withdrawal cashout
Cashing out on Mobile App

Then the final part would require you to Cash Out (or Withdraw part of the units you invested in or all of them)… In the example below, I invested ₦10,000 but I received ₦12,000 while cashing out because my interest in this investment is ₦2000. ₦10,000 + ₦2,000 = ₦12,000

Piggyvest Investment Withdrawal cashout 2

Where Will the Money Go When I Cash Out My PiggyVest Investment?

The money will go to your PiggyFlex account. Your PiggyFlex is a PiggyVest feature where you can withdraw your funds at any time with NO withdrawal fee. So, from this PiggyFlex, you can withdraw the money to your bank account at no cost.

How Can I Invest in PiggyVest?

This is simple. Open a PiggyVest account. If you already have one, sign in and click on Invest, you will find the Investment options there.

How do I Make Money From Piggyvest?

We have covered that on a previous post. Click here to read it

Is PiggyVest Free?

Yes, It is.

Is Piggyvest a Scam?

No. It’s not

How Do You Screenshot Your Cursor?

0

The first time I was asked this question was in 2018 while I was testing a beta website for a digital publishing company in Nigeria. Then it happened again yesterday at my current company. I had taken a picture of the feedback we received from a happy customer when a co-worker asked, “how do you screenshot your cursor?”.

It seems you cannot capture your cursor with snipping Tool and most other screen capture software out there.

I will just cut to the chase. I use Greenshot. It allows you to take screenshots of your screen however and whenever you want. You can capture a region of your screen or your entire browser window and save it in any image format.

Greenshot is a light-weight screenshot software tool for Windows with the following key features:

Quickly create screenshots of a selected region, window or fullscreen; you can even capture complete (scrolling) web pages from Internet Explorer.
Easily annotate, highlight or obfuscate parts of the screenshot.
Export the screenshot in various ways: save to file, send to printer, copy to clipboard, attach to e-mail, send Office programs or upload to photo sites like Flickr or Picasa, and others.
…and a lot more options simplyfying creation of and work with screenshots every day.

Being easy to understand and configurable, Greenshot is an efficient tool for project managers, software developers, technical writers, testers and anyone else creating screenshots.

Greenshot is free and you can download it for your Windows or Macbook here.

15 Differences Between A Library And A Bookshop

1

So 5 years ago, while in school, I wrote this post about the differences between a library and a bookshop. There were only 6 differences in that post. You can check it out here. In this article, we will be looking at 15 differences between a library and a Bookshop. Let’s go!

  1. Books are sold in Bookshops while you can only borrow a book, study or do your research in a library.
  2. Libraries are usually bigger than most bookshops. Because they have chairs and tables for study and large shelves containing old books. Most bookshops are small.
  3. You might find other items in a bookshop. For example, you might find pencils, math sets and other stationeries for sale but most libraries do not have them. If libraries own these things, you would not be required to pay for them.
  4. Libraries require a pass or card while you can go in and out of a bookshop as you please.
  5. Libraries have comfortable tables and chairs for research and study but bookshops do not have.
  6. Most libraries also come with free internet and computers for research. Bookshops do not.
  7. Any salesperson can work in a bookshop but libraries employ trained Librarians and Library assistants.
  8. Books in the library are acquired and processed, stamped, accessioned, catalogued, classified, and make it readily available to patrons to freely use, while books in the bookshop, on the other hand, are arranged for commercial purposes.
  9. Bookshops close in the evenings but most libraries are open 24/7.
  10. Libraries are really quiet because everyone is expected to put their phones on silent and keep conversations at a minimum. Bookshops are not…
  11. You can eat in a bookshop, take pictures and do everything else you would usually do in a shop. Libraries do not allow eating and loitering.
  12. There are usually more books and study resources in a library than a bookshop.
  13. Bookshops are mainly established for profit. Libraries are usually not established to make money.
  14. Libraries are mostly established for those who can’t afford or access books while bookshops require you to pay for books.
  15. Libraries keep older books than bookshops. In a bookshop, if a book doesn’t sell, it’s out. Libraries keep books for a very long time.

How To Copy Text From Any Image On The Web

0

A work friend and I were discussing technologies of the future once and he mentioned OCR technology which is used to convert virtually any kind of images containing written text (typed, handwritten or printed) into machine-readable text data. OCR stands for Optical Character Recognition.

UPDATE: I realized you don’t need an app or website to copy texts from images IF you use a Google Pixel. My Google Pixel 4a phone allows me to copy text from any app or website on the phone. It also has an option to copy text from any object my camera is pointed to. I don’t know If this is a Pixel-only feature or an Android 11 feature. We will find out when Android 11 is available to all other devices.

In this post, we would be looking at some really cool tools that allow you to highlight, copy, edit, and translate text from any image on the web or on your phone.

1. Screen OCR

Screen OCR is a powerful tool you can use to convert screenshots/pictures to text. It’s like Textocry but works for all your devices – PC, Mac, Android and iOS. It comes equipped with Google’s OCR engine and can turn images into editable text with the highest accuracy. It also translates your screenshot texts to 20+ languages. You can take the screenshot of any page with it, it would automatically turn that page to texts and also translate the texts if you want.
Is it heavy? No. It’s less than 8MB in size
Is it safe? Yes. Their disclaimer says they do not store any images…
And it floats, you can drag it to the side while working or minimize it when you don’t need it.
You can download it here: https://easyscreenocr.com

2. Textocry

Textocry lets you copy text from images with Optical Character Recognition. You can select an area/image with text and let the tool extract the text for you, load it into your Clipboard and you can paste it anywhere! Textocry can extract any text. It’s a Google Chrome extension and you can install it by clicking here.

3. Project Naptha

Project Naptha is a chrome extension that automatically applies state-of-the-art computer vision algorithms on every image you see while browsing the web. The result is a seamless and intuitive experience, where you can highlight as well as copy and paste and even edit and translate the text formerly trapped within an image.

It worked fine for me on a couple of receipts but it didn’t work on some Facebook posts I tried it on. So, it still needs a lot of work. It’s not perfect yet.

You might be concerned about security and privacy; Project Naptha has stated that it handles OCR and text detection locally on your computer. So, no worries.

For more information on usage, security and more, please visit  http://projectnaptha.com

4. Some Apps That Let You Copy Text From Any Image

  1. Adobe Scan: Yes, this is an app from the same Adobe that made Photoshop and a bunch of other awesome software. It comes with integrated OCR technology to instantly recognize printed text and handwriting. You can use it to turn receipts, notes, documents, photos, business cards, whiteboards — into an Adobe PDF with content you can reuse from each PDF and photo scan. You can install it on Android here and iOS here
  2. Text Scanner [OCR]: This 4.7 star rated app automatically recognizes the characters from an image. It can also access URLs or phone numbers on magazines. This is one of the fastest OCR scanners I have used on my Android. I can’t seem to find the iOS version. You should check it out by clicking here.
  3. Text Scanner (OCR) for iOS: OCR-Text Scanner recognizes any text from an image with 98% to 100% accuracy. It also has support for 92 languages. Ready to turn your iPhone into your mobile phone to text scanner.

How to Buy Apps On Google Playstore In Nigeria

0

I talked about the many ways to create and fund dollar cards from the comfort of your home in Nigeria awhile ago. Let’s take a look at how to buy apps on Google Playstore or pay for other Google services in Nigeria.

Before we start, please note that you would be required to create a dollar card to pay for apps on Google Play and virtually every other platform that hates Nigerian cards wouldn’t allow Nigerian Naira cards. This is not a hack or anything. A few Nigerian fintech startups now allow you to create Dollar cards from the comfort of your phone.

You can use the cards discussed here to pay for your Digital Ocean, Spotify, Heroku, Netflix, Amazon and Facebook Ads as well.

Creating a Free Dollar Card in Nigeria

There are two apps or options we would be looking at for this part and I have already written a step by step guide on them.
Barter: Barter is owned by Flutterwave and you can use their dollar cards to pay for Google products, Netflix, Spotify and other international services you use from time to time. Click here to create a Barter Card for free.

Wallets Africa: These guys used to be Wallets.ng but the rebranded and now let you create Dollar Cards for free in no time. Click here to create a dollar card with Wallets Africa.

I am going to assume you have created the Dollar card and funded it.

Now, let’s take a look at how to buy the apps we want on Google Playstore.

How to Buy Apps On Google Playstore

There are two ways to do this:

The first option is to go to Playstore, select the app you want to buy and click on “Buy” – You will be prompted to enter your card details. Just go ahead and enter the dollar card details and proceed to complete your purchase. Your bank’s debit card might be rejected if you use it, that’s why we created a dollar card in the first place.

The second option is to go to pay.google.com – make sure you’re logged in with the same gmail account you use for your Playstore app.

Google Playstore payment purchase add card

Click on Payment methods
Then Add Payment method
Add your dollar card details and save.

Then go to Playstore to buy the app or game you need. The card will automatically be charged.

Get Udemy Courses With Certificates for Free

0

I made a tweet about how to get Udemy courses to your email daily for free awhile back and I realized a lot of people missed it. I don’t have so many twitter followers anyways.

How does this work?

There is a platform that would send you Udemy courses daily with free coupons to get the courses for free. You will receive these courses daily once you subscribe to the platform’s email list with your phone.

Do I have to pay?

No. You don’t have to pay a dime.

Are the certificates issued by Udemy?

Yes. It’s still the same Udemy. You’re just buying the courses for free.

Can I download the Courses?

Yes. I made a separate post on there here

How do I start?

Visit this page and subscribe with your email address. That’s all.

[bctt tweet=”I just learned how to get Udemy Courses With Certificates for Free” username=”iammagnus1″]

Kuda Bank Vs Rubies Bank: Which Should You be Using and Why?

0

I wrote a comparison post between Piggyvest and Alat a year go. Then a few months later, Rubies Bank and Kudabank emerged. We will be looking at Kudabank and Rubies bank in this post, which you should use and why?

We would be looking at Onboarding, Usability and the key features you would need in a banking app.

Let’s get started.

Overview (About Both Platforms)

Kudabank looks like a work in progress. I say this because I was one of the first beta testers earlier this year. Rubies, on the other hand, looks like all the major features of the product have been rolled out. Rubies also has some cool reviews on Google “My business” – 4.8 rating with 25 reviews. It’s surprising because it looks like no one is dissatisfied with the product or company.

They are also both registered banks. KudaBank was initially called Kudimoney but it rebranded in 2019 and obtained CBN banking license. Rubies is the digital banking platform of Highstreet Microfinance Bank. Highstreet is a licenced Microfinance Bank in Nigeria. Rubies offer 100% digital, zero-fee banking and offer support for young professionals, artisans, SMEs, businesses, communities and groups, and FINTECHs.

Registration

Rubies let you choose your account number during registration. You can literally pick a 10 digit number as your account number. The registration process would take 2 minutes or thereabout. Also, you are not required to enter your BVN during registration. You can do that later when you want to upgrade your account.

KudaBank’s registration takes 4 minutes or thereabout, you’ll be asked for your number, email, state and even street name. Your BVN is requested on the registration page but you are not required to fill it during registration. You can skip it.

Rubies Bank wins this round

Identification

This part happens when you need to carry out heavy transactions or use other “extra” features on both platforms. It’s a government rule. You have to add a government-issued ID and your BVN to remove limits from your account.

KudaBank requests your BVN, any government-issued ID Card and the ID Number.
Rubies Bank requests your basic details, any government-issued ID, Utility bill and Signature.

KudaBank wins this round.

Usability

I had mentioned Rubies Bank looks like all its features have been completed. This is a good thing but the too many features are uncategorized so “pay bills” has airtime, Mobile data etc in it. Then there is another “Airtime” feature, “Data” feature somewhere in the app and you have to swipe twice to get to them. It also took a minute to find the “Change Password” and “Upgrade Account” features. You won’t find them when you go to “Profile”.

KudaBank is categorized. Payments like transfers, Airtime and bill payment are under “Payments”, FAQs, Security, Profile and other things are in “More”. Makes them easy to find.

KudaBank wins this round, easily.

Key Features

Let’s start with KudaBank. You can send and receive money, initiate cardless withdrawals, pay bills, create budgets, block a card, transfer to other banks for free 25 times per month, invite your friends and earn more, generate account statements and chat with the support team… all within the app alone. For security reasons, the app does not let you take screenshots.

Rubies Bank is Loaded. You can receive and send money for N21. Request money from anyone, Buy airtime and data, pay bills, generate account statement, independent banker (create bank accounts for customers by inviting them and you earn when they carry out a transaction), API support for FINTECHs and SMEs. It also has a Money Market where you can buy treasury bills, invest and give and request loans.

Who wins this part for you?

Conclusion

They are both great products, obviously, but Kuda bank feels more flexible with it it’s interface and features. Rubies is packed. I could go on about its additional features and we’ll sleep here today. If you’re looking for something light then try Kuda Bank. If you’re looking for a banking app that would let you manage other accounts, create invoices, request money and more then give Rubies bank a shot.

[bctt tweet=”I just read Kuda Bank Vs Rubies Bank. interesting! You should check it out.” username=”iammagnus1″]

How not to get Scammed on Instagram

0

How not to get Scammed on Instagram by debbietiyan

Some of us have been there –well, I have, and I can straight up tell you, it hurts like a whip to lose money to unscrupulous dealers. For those who haven’t, I have grouped three stages post scam which victims can definitely relate to.

First is self-denial.

In this stage, you make up all sorts of excuses for your scammers- their lines aren’t going through because it might be jammed from too many customers calling in; they no longer update their pages because their PRs are on holiday.

Second is Acceptance, you accept you’ve been a fool, and your hard-earned money is gone.

Final Acceptance and Long Term Regret

Third last longest, it is regret, suddenly you have over a hundred ideas of what the money would have been used for. Worse, everything seems to remind you of the problems the lost money would have solved.

In this post, I have compiled the most commons methods employed by the scammers. And every IG user should watch out for them.

P.S  Each time you log in to Instagram, have the old adage in mind, “if it seems too good to be true. It probably isn’t.”

Channels Infiltrated by IG Scammers

  1. Free giveaways, especially from those new brands who claim to be building awareness.
  2. Flip cash – uh huh.
  3. IG Stores – what sucks here is there are tearing apart the bridge for even legit entrepreneurs.

Here are the red flags you should watch out for when dealing with “businesses,”

  1. Recent accounts, with large followers (3000) and little to no customer engagement.

If this is much as the engagement on the brand’s comment section:

Individual account: How much?

Scammer Brand: DM for price.

It’s a scam.

2. Big talk, no show

If they claim to be big brands operating in electronics or whatever, but have a meagre following, say 3000, to 5000 and claim the reason for their recent operation or follower count to be recently hacked, or if they warn their pages might be down to upgrade, or maintenance by their (laughs) developers. They are scammers.

3. Limited Comment

If the comments section is limited, it might be they have blocked further comments due to recent fraudulent activities, and don’t want the victims trolling their pages.

4. No offline Location

If you want to buy online, but prefer to pick up the product due to proximity and they refuse pick-up even after months of “successful” business operations. It’s a scam.

5. Weird Alert Notifications during giveaways

If they announce giveaways and post weird account notifications of other recipients, it’s planned. It’s a scam.

6. Requesting Delivery Fee

If they tell you won a product but ask (or suggest) you to pay for delivery free, don’t do it.

7. Unrealistic Locations

If they sell high-end products such as iPhones, and claim to be in locations far from Nigeria’s main cities, Port-Harcourt, Lagos or Abuja. It’s a scam.

8. 100% Return  on Investment

Guys, there’s no such thing as free money. Flip cash aka. MMM reloaded is a scam. Don’t even do it!

Fixing Nokia 6.1 Plus Charging Port Issue

1

This is an article about how to fix your Nokia 6.1 Plus Charging Port Issue if you’re experiencing the same problem like over 90% of the users who use the phone.

My Nokia 6.1’s charging port suddenly became really loose awhile back. I was really confused. So I got a new charger and the same problem persisted. I actually got a charger because I thought there was a problem with my current charger. It took me 3 weeks to meet someone with my type of phone to later realize it was a general issue with Nokia 6.1 devices. Her port had had the same issue before we met and she had to get it fixed. The fix was successful.

So, I did the same. About 2 weeks later, the exact problem started again. I was frustrated. I am still frustrated because it is not a software issue that can be easily fixed with a software or Os update.

Anyway,

I still use my faulty-port device for now until I can finally make time to get it fixed the second time.

What is the Problem?

Someone in Nokia Community said its a manufacturing defect of the USB C port. And it’s obviously affecting almost anyone with Nokia 6.1 Plus phone. This is one of those problems you can’t detect the first or second day you buy a device. You find out after a few weeks or months of buying the phone.

What are the solutions?

  1. Take it to a Nokia service centre around you, especially if you still have a valid warranty. Do not take it to just any store around you. They might lose the phone and ruin your chances of getting it fixed for free because doing it at home or taking it to an unauthorized repairer will void your warranty.

    Feenan suggested on Quora “If your phone is still under warranty take it to the nearest Nokia service centre and they will get the phone charging port issue rectified as it is an issue with loose connectivity between the cable and the charging port and after that, any c type charging cable will work for sure. This worked for me so I’m sure it’ll work for your phone too.”

  2. You can take it to a slot or other trusted repairers around you to change the port if you can’t find a Nokia port. It should cost $15 or less. I paid N5,000 for mine. That is still less than $15
  3. Clip the port
    Nokia 6.1 plus
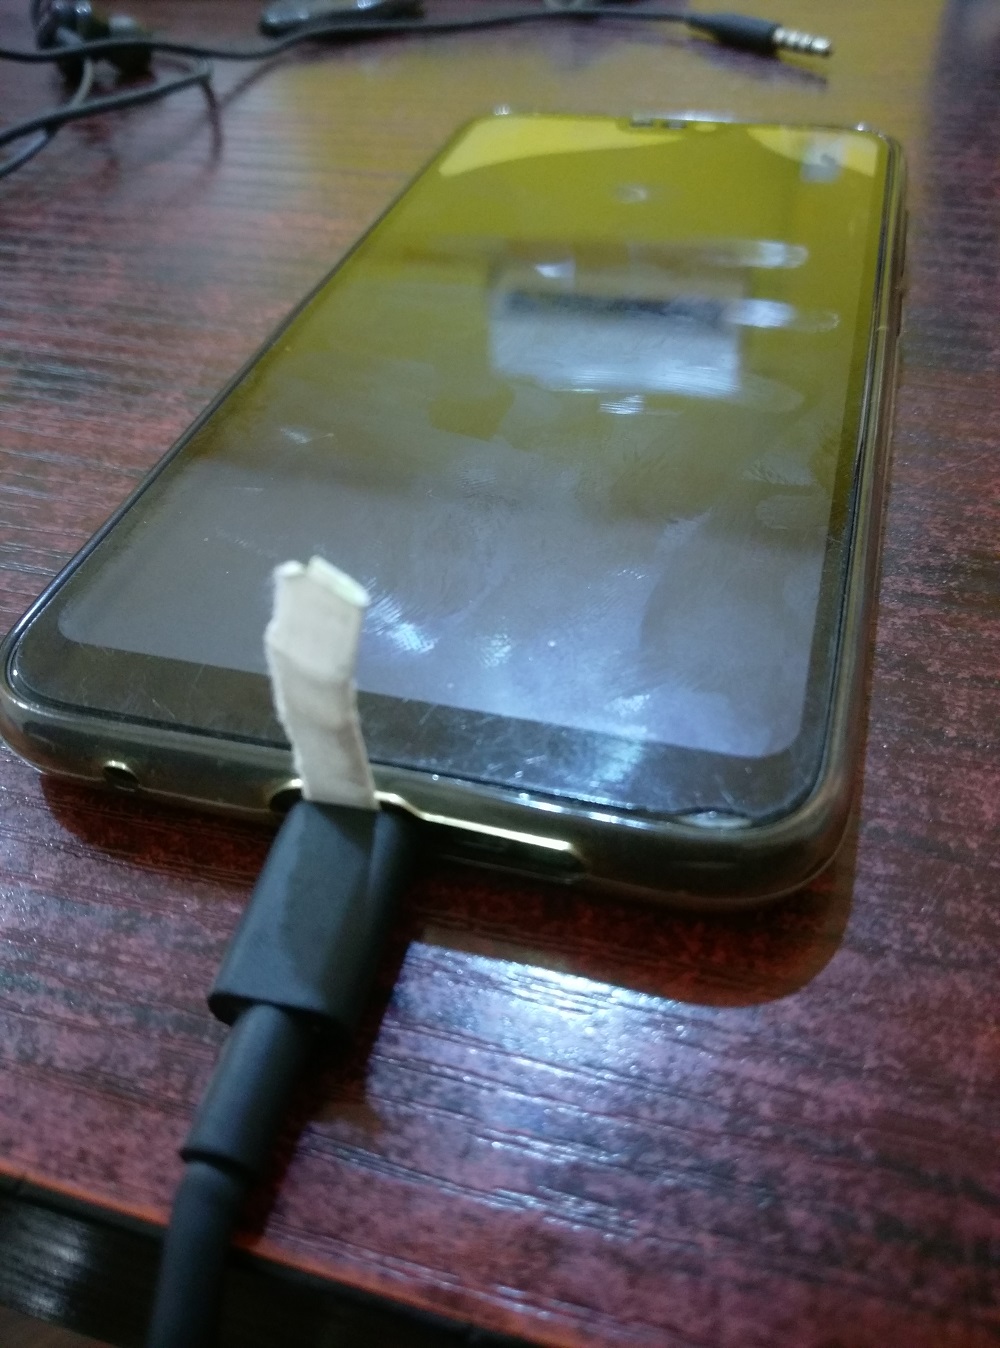
I know. I know. It sounds lame but it works. You can clip the port with a paper before inserting your USB C cable. If it doesn’t show “charging” then turn the cable around and plug it in again. Worked for me. I hope it works for you. This is just a temporary fix for those that do not have the time to go to a repair store or Nokia experience centre.
  4. Do not plug it to your laptop for charging. It will neither charge or take an entire day to fully charge. Plug it directly to a power source instead.
  5. Try changing the cable AFTER CHANGING THE PORT. A lot of users on the web reportedly changed their USB C cables to high-quality third party cables and they worked fine. I hear Elough Quick Magnetic Chargers work fine. Some users also recommended Jarvis Presents Fast Dash Type-C Charging Cable so try that too.

Okay. That’s all the tips I have received on how to fix the Nokia 6.1 Plus charging port problem. If you tried a different tool or approach or tool and it worked fine please let me know in the comment box and I will check it out and add it to this post.

Check out my YouTube videos

X